Monday, September 22, 2008

An Award for Me?


Whoa, this is very cool. When I got on here tonight to do a few updates, I saw a comment from Melissa over at Delicious Meliscious saying that she had given me an Excellent Blog award. Me...are you serious? Gosh, I really don't think I deserve it. My blog doesn't hold a candle to the many, including Melissa's that I drool over daily. With that said, I'm so grateful that people actually check out my blog and I'm so honored to think that Melissa thinks my blog is "excellent". That truly makes my day. Thank you so much, Melissa. And now, I do believe I am supposed to pass this award on to those blogs that I think are excellent.
A little FYI to the deserving recipients: this award comes with a few rules attached to it. Please find at least 10 more blogs, of any kind, which you deem to be excellent; you don't have to find 10 exactly. Quality over quantity folks! Post about the blogs you picked, linking back to me and to them. Once you’ve posted, return here to let me know your post is up, and of course let your 10 award winners know too.
Edit: When checking out a few other blogs, I realized that Kelly from Kelly Cooks...and Other Amazing Feats also passed this award on to me. Awesome! Thanks, Kelly. I really appreciate it.

Everyting Jamaican Mon!


Terrible title for the post, I know. What really matters is the recipe so please try to ignore that title, ok? I had this meat dish recently at my friend Brooke's house. It was so different and I was excited to try it out. This was the last dinner I made for our guests and it really went over well...I love how the different flavors come together. I served it with crashed hot potatoes and broccoli with cheese. Delish!


Jamaican Steak
2 lbs beef flank steak
1/4 c packed brown sugar
3 tbsp orange juice
3 tbsp lime juice
1 piece (1 1/2" x 1") fresh ginger, minced (I used 1 tsp of ground ginger)
2 tsp grated orange peel (I omitted)
2 tsp grated lime peel (I omitted)
1 tsp salt
1 tsp pepper
1/4 tsp cinnamon
1/8 tsp ground cloves

Combine sugar, juices, garlic, ginger, peels, salt/pepper, cinnamon and cloves in baking dish. Add beef, turn to coat. Cover and refrigerate to marinate.

2 options for cooking (I chose to grill):
Grill for 6 mins on each side or
Bake on 375 for 40 mins then let sit for 10 mins

Crashed Hot Potatoes

small, round potatoes with skin left on (red potatoes or small Yukons work well)
olive oil
salt
pepper

Preheat oven to 450. Add the potatoes to a large pan of salted water. Bring to the boil. Simmer briskly for 15 minutes or until potatoes are almost cooked. Remove potatoes from the pan and place on a baking tray. Using a masher or the back of a big spoon, gently squish each potato until they are half intact, half broken up. Brush with olive oil and sprinkle with salt and pepper. Roast in a very hot (450) oven for 20 minutes. I added some shredded cheddar cheese about five minutes before they were done, and served with sour cream.

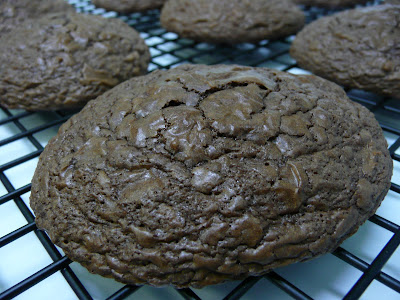
Big Brownie Cookies


Enough said, really! Need I say more? I think we should just get to the recipe for these because really they are simple and they are ridiculously good. Do yourself a favor and try these...got it?

Big Brownie Cookies
Source: Just Baking

1 (19.5 to 21.5-ounce size) box fudge brownie mix (I used Ghiradelli...yum!)
1/4 cup all-purpose flour
1/4 cup oil
3 tablespoons water
2 eggs
Preheat oven to 375 degrees F. Spray a baking sheet with nonstick cooking spray.

Place all ingredients in a large mixing bowl. Stir until all dry ingredients are incorporated, but do not overmix. Drop by rounded tablespoons onto the greased baking sheet. Leave at least 2 inches between cookies as these will spread. (I cooled the dough in the refrigerator before dropping on cookie sheet)

Bake for 12 to 15 minutes (mine were perfect in 9 mins), until cookies appear set and do not look “wet” in the middle. Let cookies sit on baking sheet for 3 minutes before removing to a wire rack to cool.

*If desired, you can stir in 1 cup of white chocolate, semisweet chocolate, or peanut butter chips; 1 cup of chopped almonds or pecans; or 1 cup of M&MS or Reese’s Pieces before scooping and dropping onto cookie sheet.

Makes about 2 dozen cookies

Crispy Chicken Salad

On Saturday, we spent the day at the beach. I wanted something easy to do for dinner and something relatively healthy. I chose a salad which I would serve chicken over. For the chicken, I settled on some chicken tenders I had seen on Lani's blog. These were perfect over salad. I used romaine, a cucumber, a tomato, shredded cheddar, hardboiled eggs and crispy turkey bacon to round out the salad...oh and light ranch dressing. I served some good ol Jiffy cornbread with it and it was delicious, filling dinner.

Honey-Pecan Crusted Chicken Tenders
salt
pepper
boneless, skinless chicken tenders
1/4 cup honey
2 tbsp Dijon mustard
3/4 tsp paprika
1/8 tsp garlic powder
1 1/4 cups finely crushed cornflakes
1/2 cup finely chopped pecans
cooking spray

Preheat oven to 400. Sprinkle salt and pepper over chicken. Combine honey, mustard, paprika and garlic in a small bowl. Combine cornflakes and pecans in a shallow dish (I crushed up the cornflakes and pecans together in my mini food processor). Brush both sides of chicken with honey mixture; dredge in cornflake mixture. Place chicken on a baking sheet coated with cooking spray. Lightly coat the chicken with cooking spray. Cook at 400 for 15 minutes or until done.

Cooking for Company

This past weekend we had 2 visitors from Virginia...my mom and my aunt Barb. Of course, this was a perfect opportunity to showcase some new recipes. Long before the day of their arrival, I was planning the perfect weekend menu. There just weren't enough days to try everything I wanted to. So, this post and the next couple will be the food that made the cut. The night they arrived, I made a dish that I've made several times...Penne a la Betsy. I knew that was sure to impress and it did.

The first morning they were with us, I whipped up this before we headed to the beach for the day. I can't even find words to describe how perfect this recipe is...easy, soft, melt in your mouth, divine...oh my goodness. Promise me you will make these...soon! Pinky promise. Ok, here goes. Thanks to Amy over at Sing for your Supper for a recipe that will never leave my side as long as I live. Yes, it's my new best friend.
Lindsay's Sweetly Simple Coffee Cake
(I may just call them Sweet Rolls from now on)

2 10-oz tubes refrigerated biscuits
1/4 c margarine, melted
1/3 c brown sugar, packed
1 1/2 tsp cinnamon
1/4 c chopped nuts (I omitted for the guests)

Arrange biscuits very close together in a 9" round cake pan (I used my springform which worked great). Mix together margarine, brown sugar, cinnamon, and nuts; spread over biscuits. Bake at 350 degrees for 20 minutes.

The late pork...


This recipe should have been posted last week sometime. Yea, you know how it is, time flies when you're having fun. Ha! Anyways, my favorite little caretaker, Lani, invited me over for dinner the week before last while Mike was working crazy hours and she knew I'd be all alone. Whoa is me! Anyways, she served this pork with some awesome crashed hot potatoes (yes, of course, the ones from Pioneer Woman) and veggies. It was delish! So, I decided to try to impress Mike with it. Seriously, easiest pork recipe ever and very impressive... good to serve for guests. You can see Lani's recipe here. I chose to make pork chops instead of her pick of pork loin...they were juicy, tender and so good! Go ahead, make these and impress someone in your life.

Apricot Glazed Pork
pork loin roast or pork tenderloin (I used 4 pork chops)
1/2 cup apricot preserves
1 package onion soup mix
2 tbsp. honey mustard

Preheat oven to 375 (oops, just realized I baked on 350 - no biggie). Mix preserves, soup mix and honey mustard in a small bowl. Line a baking dish with foil, leaving enough overhang to fold over the pork and make a packet. Place pork in dish and cover with preserve mixture. Seal foil around meat, and bake until pork is cooked through (the pork chops were perfect at around 50 mins) . Slice and serve with juices.

Sunday, September 14, 2008

Apple Butter Bars


Ok, this entry comes to you all because I had a jar of apple butter in the fridge, leftover from another recipe awhile back. So, I went to All Recipes and put in 'apple butter'. These bars came up and I decided to try them out. Well, they are delicious but I don't find them to be anything like a bar. In fact, it's really just a thin spice cake. Delicious nonetheless. Did I do something wrong...did I not bake them long enough to become bars? I have no idea, but this turned out moist and very good. I would use this as a go-to spice cake and it was so easy to make...it came together very quickly. I could eat it with or without the icing actually but it is crumbly like cake. Any thoughts?

Apple Butter Bars
Source: All Recipes

INGREDIENTS
1/2 cup butter
1 1/2 cups all-purpose flour (I used 3/4 c a.p. flour and 3/4 c wheat flour)
1/2 cup packed brown sugar
1/4 cup white sugar
1 egg
3/4 cup apple butter
1/2 teaspoon baking soda
1/2 teaspoon apple pie spice (I used cinnamon)
1 cup raisins (I omitted)
1 cup confectioners' sugar
1/4 teaspoon vanilla extract
2 tablespoons milk

DIRECTIONS
Preheat oven to 350 degrees F. Grease a 13 x 9 x 2 inch baking pan.

Beat butter or margarine until creamy. Add half of the flour, the brown sugar, white sugar, egg, apple butter, baking soda and the apple pie spice. Beat together until well blended. Beat in remaining flour and stir in raisins. Spread in prepared baking pan.

Bake for 20-25 minutes or till toothpick in center comes out clean (mine were done after 17 mins). Cool in pan on wire rack. Drizzle with icing. Cut into bars.

To Make Icing: Mix 1 cup confectioners' sugar, 1/4 teaspoon vanilla and 1 - 2 tablespoons milk. Mix to drizzling consistency.

Orange Mandarin Chicken


I knew I wanted to make 2 new meals this weekend because Mike has been working insane hours lately and because of that the company orders in lunch and dinner everyday. I knew he would be sick of eating out so I decided on 2 meals. I had found this recipe on Cooking Light's website and it looked easy enough. Better yet, I already had all of the ingredients on hand. I served this over brown rice. This turned out great! The key is to pour a lot of the sauce over the chicken and rice (noodles, etc...whatever you serve with it). The sauce is where all of the flavor is! I didn't have jalapeno peppers so I just sprinkled in some crushed red pepper. We loved how the sweetness of the mandarin oranges mixed with the 'kick' of the red pepper. This was a really good, light meal.

Orange Mandarin Chicken

Ingredients:
2 teaspoons dark sesame oil
4 (4-ounce) skinless, boneless chicken breast halves (I used 3 chicken breasts)
1/2 teaspoon salt
1/4 teaspoon black pepper
1 (11-ounce) can mandarin oranges in light syrup, undrained (I used an 8 oz can)
1/2 cup chopped green onions
1 tablespoon finely chopped seeded jalapeño pepper (sprinkled red pepper instead)
1 teaspoon bottled minced garlic (I used 2 fresh garlic cloves)
1/2 cup fat-free, less-sodium chicken broth
1 tablespoon low-sodium soy sauce
2 teaspoons cornstarch

Preparation:
Heat oil in a large nonstick skillet over medium-high heat. Sprinkle chicken with salt and pepper. Add chicken to pan; cook 4 minutes on each side or until browned.

While chicken cooks, drain oranges in a colander over a bowl, reserving 2 tablespoons liquid. Add oranges, 2 tablespoons liquid, onions, jalapeño, and garlic to pan. Reduce heat; simmer 2 minutes.

Combine broth, soy sauce, and cornstarch; add to pan. Bring to a boil; cook 1 minute or until slightly thickened.

Thursday, September 11, 2008

Do you know the Muffin Lady?


Mike has been working insanely long hours at work for the past few weeks. There were a couple muffin recipes I was dying to try. Put the two together and everything works out perfectly. I went for 2 types so I would have plenty to send with him and a few to keep at the house. These turned out awesome and were the perfect breakfast treat. Both were delicious and I will definitely make them again.

Of course, there are those who came before me. No, I don't come up with my own recipes... don't be silly. So if you'd like to check out where they each came from, check out these blogs: What's Cooking in the Orange Kitchen and Kelly Cooks...and Other Amazing Feats.

I followed the recipes exactly with minor changes (see parenthesis).


Sugar & Spice Muffins
Source: What's Cooking in the Orange Kitchen

* 1 3/4 cups all-purpose flour (I used 1 c a.p. flour and 3/4 c wheat flour)
* 1 1/2 teaspoons baking powder
* 1/2 teaspoon salt
* 1/2 teaspoon ground nutmeg
* 1/3 cup vegetable oil
* 3/4 cup white sugar
* 1 egg
* 3/4 cup milk
For Topping:
* 3/4 cup white sugar
* 1 teaspoon ground cinnamon
* 1/2 cup butter, melted (only about 4 tbsp is needed - 1/2 cup is way too much)

DIRECTIONS

Preheat oven to 350 degrees F. Lightly grease 12 muffin cups or use liners.

In a large bowl, combine flour, baking powder, salt and nutmeg. In a separate bowl, beat together oil, 3/4 cup sugar, egg and milk. Stir egg mixture into flour mixture, just until moistened. Spoon batter into prepared muffin cups.

Bake in preheated oven for 20 to 25 minutes, until a toothpick inserted into a muffin comes out clean. (I found that they only needed about 18 mins, I baked for 20 and they were a bit dry)

While muffins are baking, mix together 3/4 cup white sugar and 1 teaspoon cinnamon. In a separate small bowl, melt butter.

While muffins are still hot, dip tops in melted butter and then in cinnamon sugar mixture.


Banana Coconut Muffins
Source: Kelly Cooks..and Other Amazing Feats

1 1/4 cups all-purpose flour (I used 3/4 c a.p. flour and 1/2 c wheat flour)
1 teaspoon baking powder
1/4 teaspoon salt
2 very ripe bananas, mashed (3/4 cup)
1 stick (1/2 cup) unsalted butter, melted
2/3 cup sugar
1 large egg
1/2 teaspoon vanilla
3/4 cup sweetened flaked coconut

Directions
- Preheat oven to 375°F. Line muffin cups with liners.
- Whisk together flour, baking powder, and salt in a bowl.
- Whisk together bananas, butter, sugar, egg, vanilla, and 1/2 cup coconut in a large bowl until combined well, then fold in flour mixture until flour is just moistened.
- Divide batter among lined muffin cups and sprinkle with remaining 1/4 cup coconut.
- Bake until muffins are puffed and golden, about 25 minutes. (I baked for about 22 mins)

Tuesday, September 9, 2008

Zucchini Boats


Let me start by saying that I love zucchini. But we typically grill it and that becomes boring. As soon as I saw this recipe, I promised myself I would make it sooner than later. I made these on Sunday night to go along with our grilled burgers and fresh corn on the cob. They were awesome! They were even good leftover, as I had one the next night alongside a salad. Really, delicious! Do yourself a favor and try these. Maybe you can get them to photograph better than I could. I have to admit we were starving and I really didn't feel like messing around with it much. I found this recipe on one of the blogs that I check out regularly, Big City Cooking. Oh, and I think these would be a nice appetizer for your next dinner party as well.

**I used 3 zucchinis so I just tripled everything except the chicken stock and the butter. I found that the amounts given below were plenty even for 3 zucchinis.

Zucchini Boats
originally adapted from Cooking for Fun

1 zucchini
2 cloves garlic
2 tbsp chives
1 tbsp butter
1/2 cup chicken stock/broth
salt & pepper
2 tbsp grated Parmesan cheese
2 tbsp Ricotta cheese
2 tbsp marinara sauce

Preheat oven to 350F.

Cut zucchini in half lengthwise. Scoop out the insides, leaving about 1/4 inch as a shell. Sprinkle with olive oil and place in the oven for 15 minutes, or until done.

Chop pulp and garlic. In a skillet saute the zucchini and garlic in butter for 3-4 minutes until soft. Add broth and marinara sauce. Reduce heat and simmer for 10 minutes or until liquid has evaporated. Season to taste.

Mix both cheese, chives and the zucchini mixture and stuff the zucchini shells. Then place under broiler for 5 minutes or unitl lightly browned.

A Whopper of a Cookie!

This week's TWD was certainly different from any cookie I've made before. First, it used Whoppers...I hadn't had one of those in such a long time. For the most part, this recipe came together pretty easily. Chopping the whoppers was the most time-consuming part but it wasn't bad. I chopped mine in 1/2 and I think that worked well. Any smaller and you probably wouldn't have gotten the same crunch in the cookie. These were very good although they turned out a little flatter than I had hoped for. I used semi-sweet chocolate chips instead of the bittersweet chocolate. I want to try one tonight with a scoop of vanilla ice cream. Yum!

This week's pick came from Rachel over at Confessions of a Tangerine Tart so make sure you go check out her blog. There you will find the recipe for these candy-licious cookies. And, as always, head over to Tuesdays With Dorie to see all of the other great entries.

Saturday, September 6, 2008

Cookies & Cream

I decided to fly to VA for the Labor Day weekend. That Saturday was my mom's birthday and Sunday was my stepdad's birthday. So, I thought it would be fun to surprise them. My aunts were in on it, of course. I told Aunt Barb that I would take care of making the cake/cupcakes. I knew right away that I wanted there to be oreos involved as those are my mom's favorite. If you are ever in need of a cupcake recipe, check out the How To Eat A Cupcake blog. She has everything you could imagine. She had made cookies & cream cupcakes both from scratch and from a box mix base. She said using the box mix turned out better so that's what I went for. They turned out great...you should definitely try them out. Since I would be at my aunt's house, I figured it would be easier to just buy icing and add crushed oreos to it, so that's what I did. I used Betty Crocker's Whipped Fluffy Vanilla... good stuff! Here is her recipe:

Cookies & Cream Cupcakes
Makes 22-24 cupcakes

30 Oreo cookies
1 box plain white cake mix
1 cup sour cream
1/2 cup vegetable oil
3 large eggs
1 teaspoon pure vanilla extract

1. Place a rack in the center of the oven and preheat the oven to 350°F. Line 24 cupcake cups with paper liners. Set the pans aside.

2. Count out 12 Oreos and separate the top and bottom wafers. Make sure each has some of the icing on it. Place one wafer, icing side up, in the bottom of each paper liner. Set them aside. Place the remaining 18 Oreos between sheets of waxed paper or in a large, closed zipper-lock bag and crush them by rolling over them with a rolling pin. Set these crumbs aside.

3. Place the cake mix, sour cream, oil, eggs, and vanilla in a large mixing bowl. Blend with an electric mixer on low speed for 30 seconds. Stop the machine and scrape down the sides of the bowl with a rubber spatula. Increase the mixer speed to medium and beat 1 1/2 minutes more, scraping down the sides again if needed. Measure out 1 1/2 cups of the crushed Oreos and fold these into the batter until well incorporated. Set aside the remaining crushed Oreos for the frosting. Spoon or scoop 1/3 cup batter into each lined cup­cake cup, filling it three quarters of the way full. (You will get between 22 and 24 cupcakes; remove the empty liners, if any.) Place the pans in the oven.

4. Bake the cupcakes until they are lightly golden and spring back when lightly pressed with your finger, 18 to 20 minutes. Remove the pans from the oven and place them on wire racks to cool for 5 minutes. Run a dinner knife around the edges of the cupcake liners, lift the cup­cakes up from the bottoms of the cups using the end of the knife, and pick them out of the cups carefully with your finger­tips. Place them on a wire rack to cool for 15 minutes before frosting. (I left mine in the liners and served like normal)

For Icing, if using store bought, like I did: simply crush the oreos and mix into frosting. Note: if you plan to pipe the icing on you will need to make sure they are crushed very fine. They kept getting stuck in my tip and I finally got annoyed and gave up.

*Store these cupcakes, in a cake saver or under a glass dome, at room temperature for up to 3 days or in the refrigerator for up to 1 week. If you plan to freeze them, don't add the cookie-crumb topping. Wrap them in aluminum foil or in a cake saver and freeze for up to 6 months. Thaw the cup­cakes overnight in the refrigerator and top with cookie crumbs before serving.
Happy Birthday, Mom & Johnny!!
The little man sure did enjoy it, well the icing at least. Dig in, Cole!